Thought Flow

Technology and other things

Author: David

  • A game of (AI) telephone

    A game of (AI) telephone

    Do you remember playing a game called “telephone” (or “Chinese Whispers”) as a kid?

    The game is simple: The first player comes up with a short sentence like “Alice and Bob walked to the bakery”. They then whisper this sentence to the second player, who then whispers to the third player etc.

    The fun part happens at the end, when the final player tells everyone what they heard, and everyone usually laughs because the sentence has changed a lot when passed from ear to ear, e.g. “Alice ran after Bob who stole her cake”1

    What if we made a pair of AI systems play a similar game of communication with each other — but with a small twist: Instead of communicating with voices, the systems communicate by text and images.

    The game would go like this:

    1. I choose a real image and write a one-sentence description of the image, just to make sure the first input is “real”.
    2. AI 1 — a text-to-image generator — would take the description and turn it into an image.
    3. AI 2 — an image-to-text generator — would take the image from step 2 and create a new image description.
    4. Go back to step 2 and feed this image description to AI 1.

    Without further ado, let us try it out, and we will get to the technology later in the post.

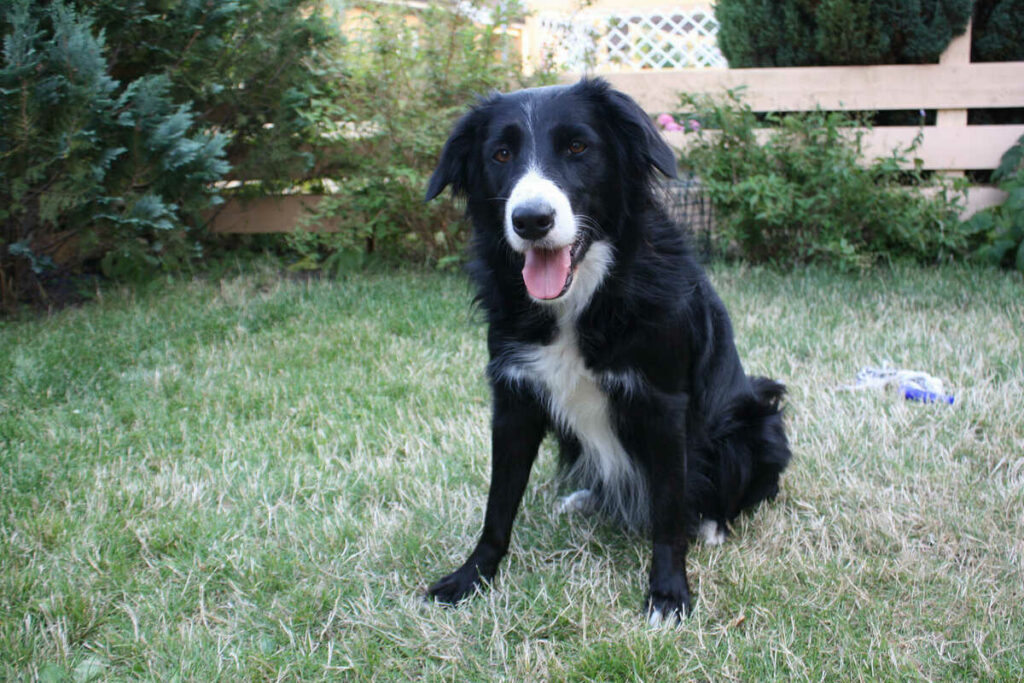
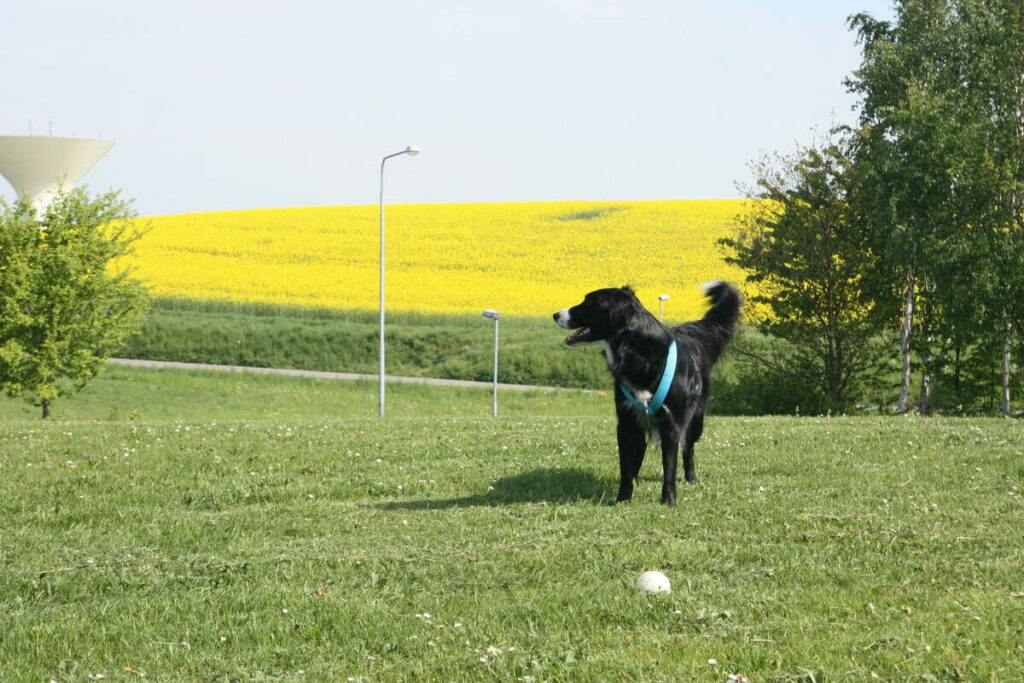
    For the first image, I chose this picture with the description “dog standing on a grass hill with a yellow field in the background”:

    With both the image and the description as the first inputs to the image generator, I got the following series of images and text descriptions:

    Image generated from text “dog standing on a grass hill with a yellow field in the background”

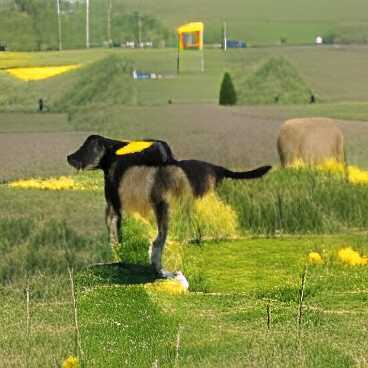
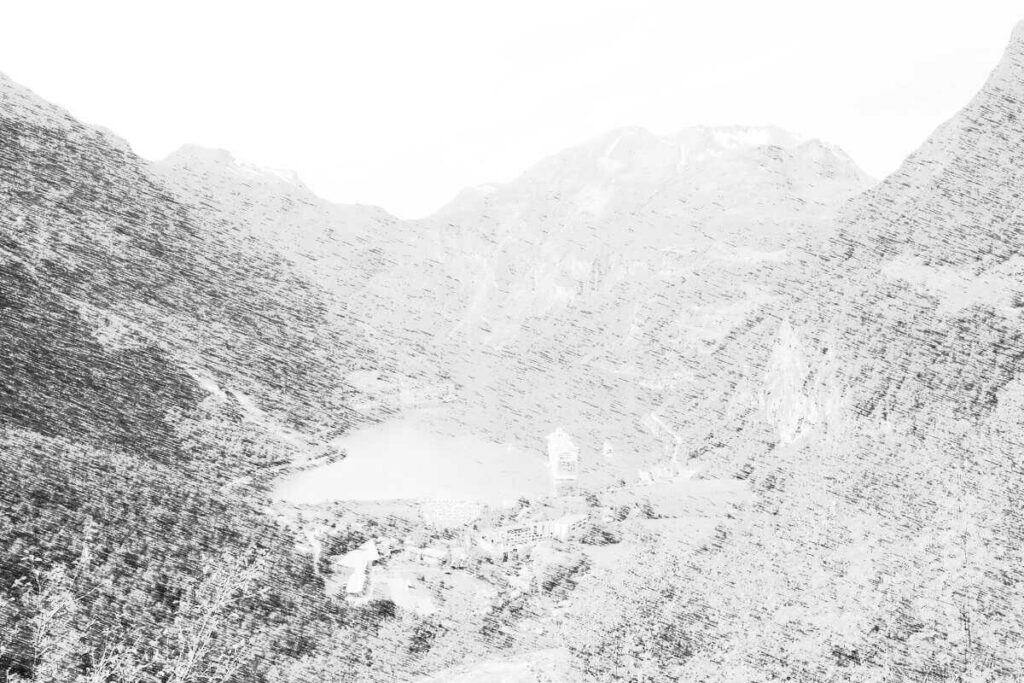
    The above image was interpreted by AI 2 as “a dog on green grass” (not bad actually) and that description was fed back to AI 1 to produce:

    Image generated from text “a dog on green grass”

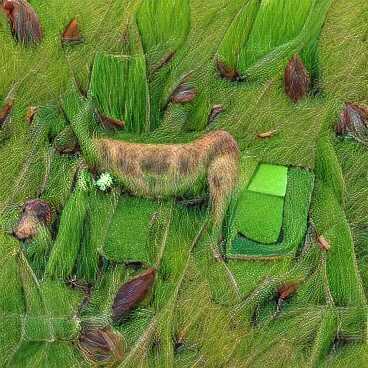
    This image was interpreted by AI 2 as “a bunch of atm food” which doesn’t make sense, but who am I to judge, so back it went to AI 1, and we got the following image:

    Image generated from text “a bunch of atm food”

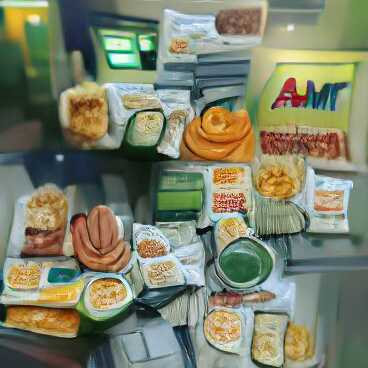
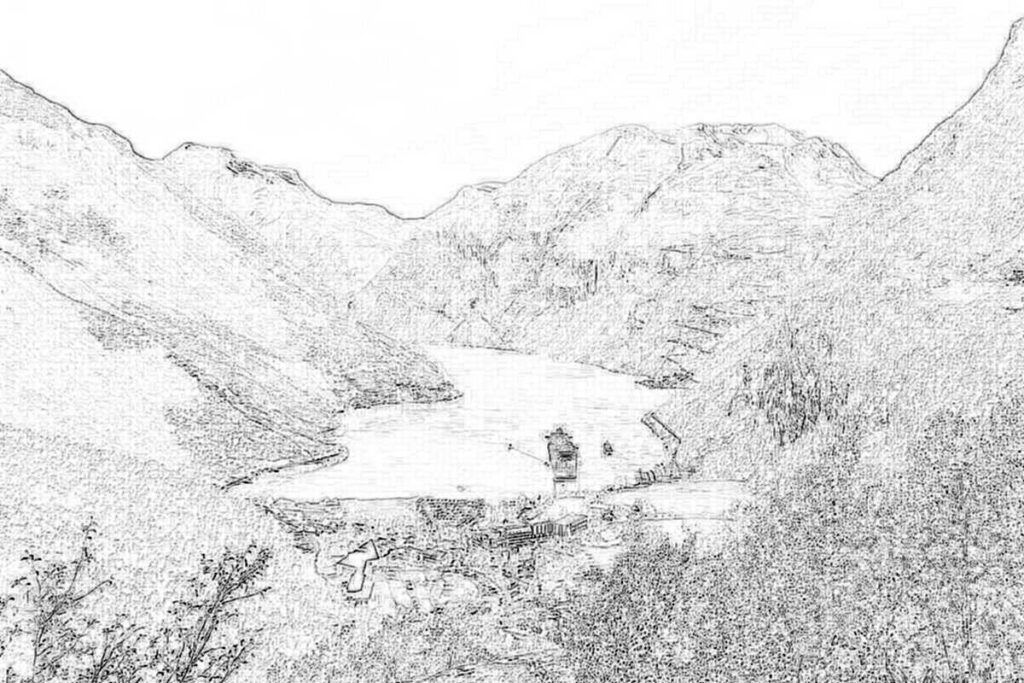
    Yeah that looks like bread, sausages and an… “AMT”? Not quite an ATM, but hey, it’s close. This image was interpreted as “a display case are sitting on a kitchen table” and based on this, we get our final image:

    Image generated from text “a display case are sitting on a kitchen table”

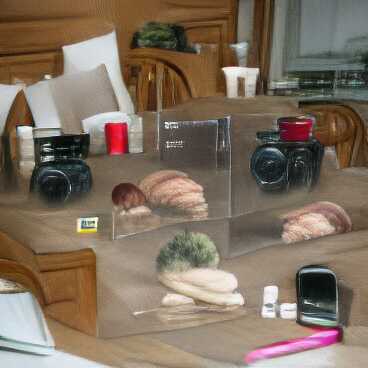
    I think it tried to draw cameras and a cellphone, but it is a bit abstract. This image is interpreted as “a few on a wall”.

    And there you have it. We went from “dog standing on a grass hill with a yellow field in the background” to “a few on a wall” and from a nice summer image of my dog to a display of electronic devices?

    It is worth noting that the above is just one of many possible outcomes from the same starting point. The models use randomness in their configurations, which means that the end result is almost never the same. It might be interesting to automate the process in the future.

    For now, I hope you just enjoyed this little experiment.

    The tech behind

    As mentioned in the introduction, the “game” consists of two deep learning (“AI”) systems. I actually already wrote a post about one of them, the image captioning model from the Tensorflow tutorial. This is what I called “AI 2”, and it can take an image and produce a caption for it.

    For this experiment, I let the model train a bit longer than in the previous post, but I did not really evaluate it, so the captions are still hit or miss. However, you can see from its first interpretation “a dog on green grass” that it is not terrible.

    The image generator (“AI 1”) is the new and shiny thing here. It is called VQGAN+CLIP, and it actually consists of two models that work together to produce an image from a piece of text. The specific version I am using here is based on work by Katherine Crowson found in this vqgan-clip repository on Github (specifically the notebook with the z+quantize method).

    For this experiment, I let the system run for a few minutes before stopping it and taking the produced image. I do not fully understand how the VQGAN+CLIP system works, and it is probably also beyond the scope of this post to discuss it, but I encourage you to search for examples online.

    Its creations are often abstract with a hint of reality, so they end up looking quite surreal and sometimes disturbing. This blog post about “AI movie posters” is what got me interested in VQGAN+CLIP, and I might explore it a bit more in the future as well.

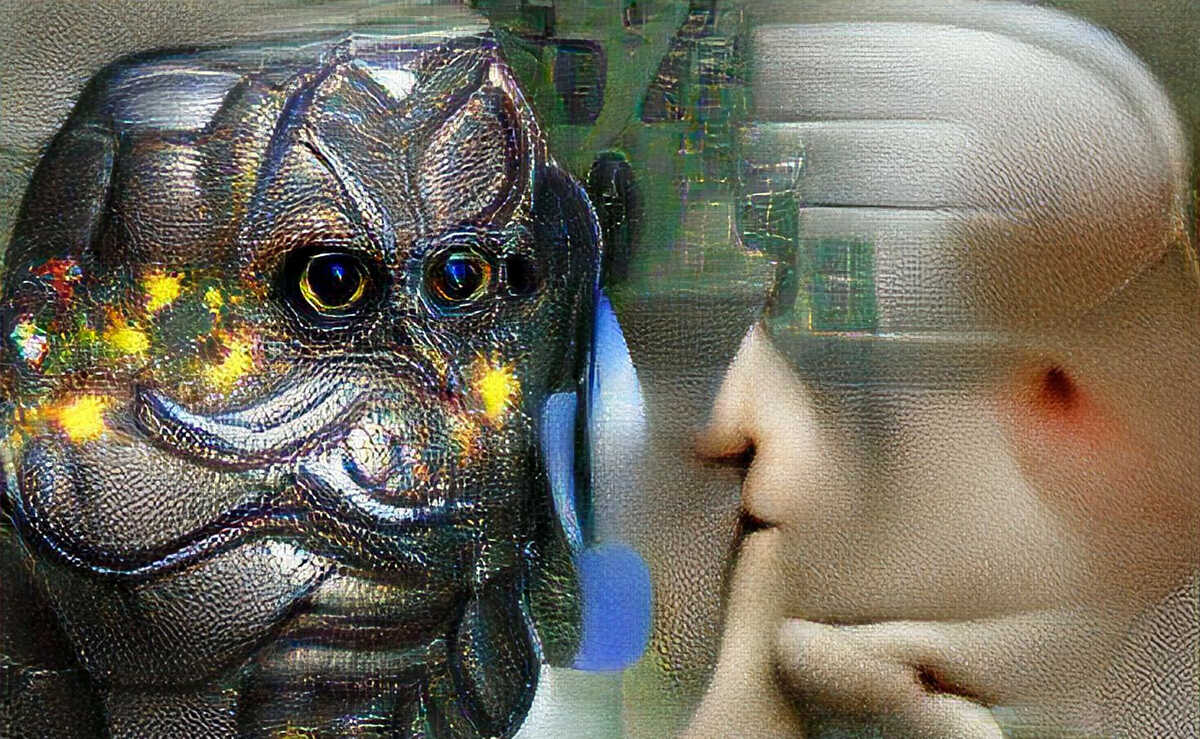
    By the way, the image at the beginning of this post is also made by VQGAN+CLIP from the text “An artificial intelligence whispers to another artificial intelligence”, and it is scaled up with a super resolution neural network called esrgan. Good stuff!

  • Lyrics generator talk

    As part of a recent talk I did about my now-quite-old lyrics generator, I used the opportunity to update the code a bit and share a few of the trained models, including the world famous Gene Lyrica One.

    The new “rock” models have similar performance to Gene Lyrica One, but subjectively seemed to be slightly more interesting in some cases. The output is still nonsensical and the same words and sentences are often repeated multiple times, so needless to say I have still not been able to make good progress here.

    During the talk, I was also made aware of another cool project which is much more comprehensive than mine, these lyrics do not exist, so that is worth mentioning here as well.

    And of course, I can’t post something about the lyrics generator without any lyrics. This one came about in multiple steps:

    1. I used the seed text “hello world is a dream” which was the title of the original blog post. The next sentence “happiness is the one” was then generated along with a bunch of subsequent nonsense.
    2. The two sentences fed into the generator again and it produced “the world was my world”.
    3. Repeat this process a few times…

    hello world is a dream
    happiness is the one
    the world was my world
    who would be me

    give me all the other day
    just like a star
    you were high

  • Language detection with fasttext

    I have used fasttext for language detection a few times, but I always seem to forget how to install and predict the language, so I created this little gist to remind myself of how to download, instantiate the model and predict the language of a piece of text.

  • Simple photo effects with ImageMagick

    Simple photo effects with ImageMagick

    I recently explored the capabilities of converting photos to something that looks hand-drawn with a pencil using ImageMagick. It is difficult to get good results, but I thought I would share a few one-liners that I found useful to play around with, as well as a bonus effect that turns a photo into something resembling a miniature.

    I have collected all the commands in a gist here.

    ImageMagick, as the name implies, can do a lot of basic and advanced image manipulation out of the box. For example, this is my current go-to command for resizing all images in a folder:

    mogrify -resize 1200 *.jpg

    mogrify and convert are two commands included with ImageMagick, and they can do a lot more than just resize photos.

    I will be using this photo of the Geirangerfjorden in Norway as an example throughout:

    Photo of Geirangerfjorden in Norway.

    By the way, I also used Imagemagick to reduce the resolution and size of that photo so it was better suited for this post:

    convert -format jpg \
        -strip \
        -interlace Plane \
        -quality 50% photo.jpg \
        -resize 1200 photo_resized.jpg

    Note: Before running any of the commands in the following sections, you might want to make sure your terminal has extendedglob enabled:

    # zsh
    setopt extendedglob
    # bash
    shopt -s extglob

    Finding outlines

    My use case for finding outlines was to simplify photos into basic lines that I could use as models for my own pencil drawings.

    This command finds very sparse and minimal outlines using the canny edge detector:

    convert ^*canny*.jpg \
        -set filename:original %t \
        -resize 1200 \
        -canny 0x3+5%+15% \
        -negate '%[filename:original]_canny1.jpg'
    Image outline using canny edge detector – v1

    With a small adjustment to the parameters, we can get a bit more detail and more lines.

    convert ^*canny*.jpg \
        -set filename:original %t \
        -resize 1200 \
        -canny 0x1+10%+20% \
        -negate '%[filename:original]_canny2.jpg'
    Image outline using canny edge detector – v2

    You can play around with the canny parameters for different results..

    Pencil/sketch effect

    Trying to get closer to an actual pencil-like effect, I played around with various methods. Most of the commands were modified from this article.

    ImageMagick has a convert-to-pencil effect that is called sketch. It is a bit difficult to get good results though, and the command can be very slow if a large radius (one of the parameters) is used.

    This was the best I could do when playing around with the parameters for a few minutes. Notice the weird trick where I negate the colors — it was the only way to avoid the photo becoming completely white in the middle where the ship is. That is why the sky becomes so dark:

    convert geiranger.jpg \
        -resize 1200 \
        -colorspace gray \
        -negate \
        -sketch 0x20+20 geiranger_sketch.jpg
    Convert photo to pencil-like format using the sketch parameter.

    Another way to create pencil-like photo conversions is using the technique that the sketch parameter is based on. This involved creating an intermediate image which is used as a filter over the image to give the pencil-stroke effect.

    I have to admit, I have no idea what is going on in these commands, and I mostly got them from the article mentioned above. First, create some noise with motion blur:

    convert -size 256x256 \
        xc: +noise Random \
        -virtual-pixel tile \
        -motion-blur 0x20+20 \
        -charcoal 1 \
        -resize 50% pencil_tile.gif

    Then convert the photo:

    convert geiranger.jpg \
        -colorspace gray \
        \( +clone -tile pencil_tile.gif -draw "color 0,0 reset" \
        +clone +swap -compose color_dodge -composite \) \
        -fx 'u*.2+v*.8' geiranger_sketch2.jpg

    The result is slightly different, but not perfect:

    Convert photo to pencil-like format using intermediate noise tile.

    A third technique is to use the charcoal parameter which is actually being used to create the intermediate image above:

    convert geiranger.jpg \
        -charcoal 1 geiranger_char1.jpg
    Convert photo to pencil-like format using -charcoal parameter

    Miniature faking

    I have always been fascinated by those photos that have a blurry effect that make them look like they are miniatures. The effect is called miniature faking and is related to tilt-shift photography.

    The aforementioned article has an example. It works in some cases, but most of the time, the outcome is very bad. It happens to be ok for the Geiranger photo though. Slightly adjusted from the article:

    convert geiranger.jpg -sigmoidal-contrast 10x50% \
        \( +clone -sparse-color Barycentric '0,0 black 0,%h gray80' \
        -solarize 50% -level 30%,0 -write mpr:blur_map \) \
        -compose Blur -set option:compose:args 10x0 \
        -composite mpr:blur_map \
        -compose Blur \
        -set option:compose:args 0x10 \
        -composite geiranger_blur.jpg
    Convert photo to a “miniature” scene. This does not work well on all photos.

    That is it for now. Good night :-)

  • Image captioning model

    Progress is slow for my various hobby efforts to generate images, create lyrics or even detect my dog in an image, but I do still experiment a little bit when I have the time for it.

    Today, I ran through the image captioning tutorial from Tensorflow, because why not. I trained it on a reduced set of 5000 images compared to the tutorial, but otherwise the code is identical.

    The purpose of the model is to look at an image and predict a caption for the image, e.g. “man sits next to computer” if the model was looking at me right now.

    The results are quite hilarious at this point, and it has given me some ideas for future development that could potentially delight or confuse.

    Anyway, for now, here is a caption that is as close to being accurate as I could get today. It’s a picture of Mila, my dog, with the predicted caption “a little dog sitting on dirt field”. Not too bad.

    Image of Mila, my dog, sitting on a lawn
    Best predicted caption: a little dog sitting on dirt field

    The model has a bit of randomness in its output, so the same image might produce multiple different results. For example, the image above also produced “a dog is surfing on a field with it’s toppings in front of grass” as well as the completely nonsensical “a fire up of a green grass next to a grass in a grassy field”.

    I also tried a few other images, but I am a too lazy to look up the proper attribution for including them in this post, so here is another image of Mila with the strange caption “a dog that is standing in tall grass in the grassy field with a large dog and white dog is standing in a grassy field next to a tree”

    Best predicted caption: a dog that is standing in tall grass in the grassy field with a large dog and white dog is standing in a grassy field next to a tree

    There is also the slightly more boring “a dog standing in front of a grass” and my personal favorite (although it’s a bit disturbing) “a dressed dog in a field eaten horse to enjoy zebras grass in the grass”.

    That is it for now. Not much content here, but I felt like writing a post. Stay tuned for possibly more silliness when the spark of energy hits.